Shopping List Quick Start - CLI
This Quick Start uses a familiar concept - a shared Shopping List - to demonstrate how to create and use a Vendia Share Universal Application (Uni).
This Quick Start uses the Vendia Share Command Line Interface (CLI) to create the Uni that will be used in this Quick Start. Alternative, the Shopping List Quick Start - Web can be followed if you prefer a visual over a command-line interface.
First Things First
Before getting into the mechanics of deploying your Uni, you should first consider what data you want to store and share with others. Let's consider data that different parties may need to access where each party needs to have a consistent view.
Some of you may recognize this as an inventory management system.
Lots of families use different techniques to share shopping lists. Some use pen-and-paper. Some use spreadsheets. Others use email. Still others use text messages.
The point is that different people need to have access to the same set of data and know what changes have been made and by whom. If someone crosses off an item on the list in my house and it's not in the pantry I need to know who did it. ;-)
Define Your Uni
We'll need to create a registration file that contains information about our Uni:
-
Its name
-
Where to find the schema
-
The Uni participants, each represented as a Node in our Uni topology
NOTE: You will need to provide your Vendia Share userId when defining your nodes. For this quick start, please use your same userId across all nodes.
ANOTHER NOTE: Pick a unique name for your Uni that begins with test- - by default all Unis share a common namespace so here is your chance to get creative.
FINAL NOTE: Save all of the files mentioned below to the same directory.
Sample Registration file - save as registration.json
{
  "name": "test-shopping-list",
  "schema": "schema.json",
  "nodes": [
    {
      "name": "ParentalUnit1",
      "userId": "me@domain.com",
      "region": "us-west-2",
      "csp": "aws"
    },
    {
      "name": "ParentalUnit2",
      "userId": "me@domain.com",
      "region": "us-west-2",
      "csp": "aws"
    }
  ]
}
Sample Schema file - save as schema.json
{
  "$schema": "http://json-schema.org/draft-07/schema#",
  "$id": "http://vendia.com/schemas/demos/shopping-list.json",
  "title": "Shopping List",
  "description": "Store shopping list data",
  "type": "object",
  "properties": {
    "ShoppingList": {
      "description": "Items on the shopping list",
      "type": "array",
      "items": {
        "type": "object",
        "properties": {
          "item": {
            "description": "What to buy",
            "type": "string"
          },
          "quantity": {
            "description": "How much to buy",
            "type": "string"
          },
          "recommendedLocation": {
            "description": "Where I should buy",
            "type": "string"
          },
          "bought": {
            "description": "Whether it has been bought",
            "type": "boolean"
          },
          "timestampAdded": {
            "description": "When the item was added",
            "type": "string",
            "format": "date-time"
          },
          "timestampPurchased": {
            "description": "When the item was purchased",
            "type": "string",
            "format": "date-time"
          }
        },
        "required": ["item"]
      }
    }
  }
}
Create Your Uni
Now we can use the files required to create a Uni, we can use the Vendia Share Command Line Interface (CLI) to do so.
Install the CLI
The share-cli can be installed using the NodeJS Node Package Manager (npm).
To install the CLI globally, run the following command:
npm install @vendia/share-cli -g
NOTE You can also install Vendia CLI inside a project (instead of globally).
For more information, please visit the @vendia/share-cli NPM package page or view the CLI commands list.
Login and Create a Uni
Once we have the files saved we are able to deploy our Uni using the share-cli.
You must be signed up for Vendia Share in order to use its APIs. Otherwise, any attempt to invoke the APIs (directly or via the CLI) will result in an “unauthorized user” error message. You will need the user id and password for the following steps.
To log in, run share login:
share login

> Enter your email address
Username: me@domain.com

> Enter your vendia password for me@domain.com
Password: ********************

✔  Logged in as me@domain.com
If your login expires, the share CLI will prompt you to log in again during any other command. If you don't yet have a user account for Vendia Share you will first need to sign up. If you have an account but have forgotten your username and password you can reset your password.
The share uni create command can be used to deploy our Uni.
share uni create --config registration.json
Check Uni Status
The Uni deployment will take approximately 4 minutes. We can check on the status of the Uni by running the share get command.
% share get --uni test-shopping-list # Adjust Uni name based on the name you specified
Getting test-shopping-list info...
┌─────────────────────┐
│   Uni Information   │
└─────────────────────┘
Uni Name:    test-shopping-list.unis.vendia.net
Uni Status:  PENDING_REGISTRATION
Node Count:  2
Nodes Info:
├─ ⬢ ParentalUnit1
│  ├─ name: ParentalUnit1
│  ├─ status: DEPLOYING
│  └─ resources:
│     ├─ graphqlApi
│     │  ├─ httpsUrl
│     │  ├─ apiKey
│     │  └─ websocketUrl
│     ├─ aws_AsyncIngressQueue
│     │  ├─ url
│     │  └─ name
│     ├─ aws_FileStorage
│     │  ├─ arn
│     │  └─ name
│     ├─ aws_BlockNotifications
│     │  └─ arn
│     ├─ aws_DeadLetterNotifications
│     │  └─ arn
│     └─ aws_Cognito
│        ├─ userPoolId
│        ├─ userPoolClientId
│        └─ identityPoolId
└─ ⬢ ParentalUnit2
   ├─ name: ParentalUnit2
   ├─ status: DEPLOYING
   └─ resources:
      ├─ graphqlApi
      │  ├─ httpsUrl
      │  ├─ apiKey
      │  └─ websocketUrl
      ├─ aws_AsyncIngressQueue
      │  ├─ url
      │  └─ name
      ├─ aws_FileStorage
      │  ├─ arn
      │  └─ name
      ├─ aws_BlockNotifications
      │  └─ arn
      ├─ aws_DeadLetterNotifications
      │  └─ arn
      └─ aws_Cognito
         ├─ userPoolId
         ├─ userPoolClientId
         └─ identityPoolId

To display the schema use the --json flag. Example: "share get test-jgg-shopping-list.unis.vendia.net --json"
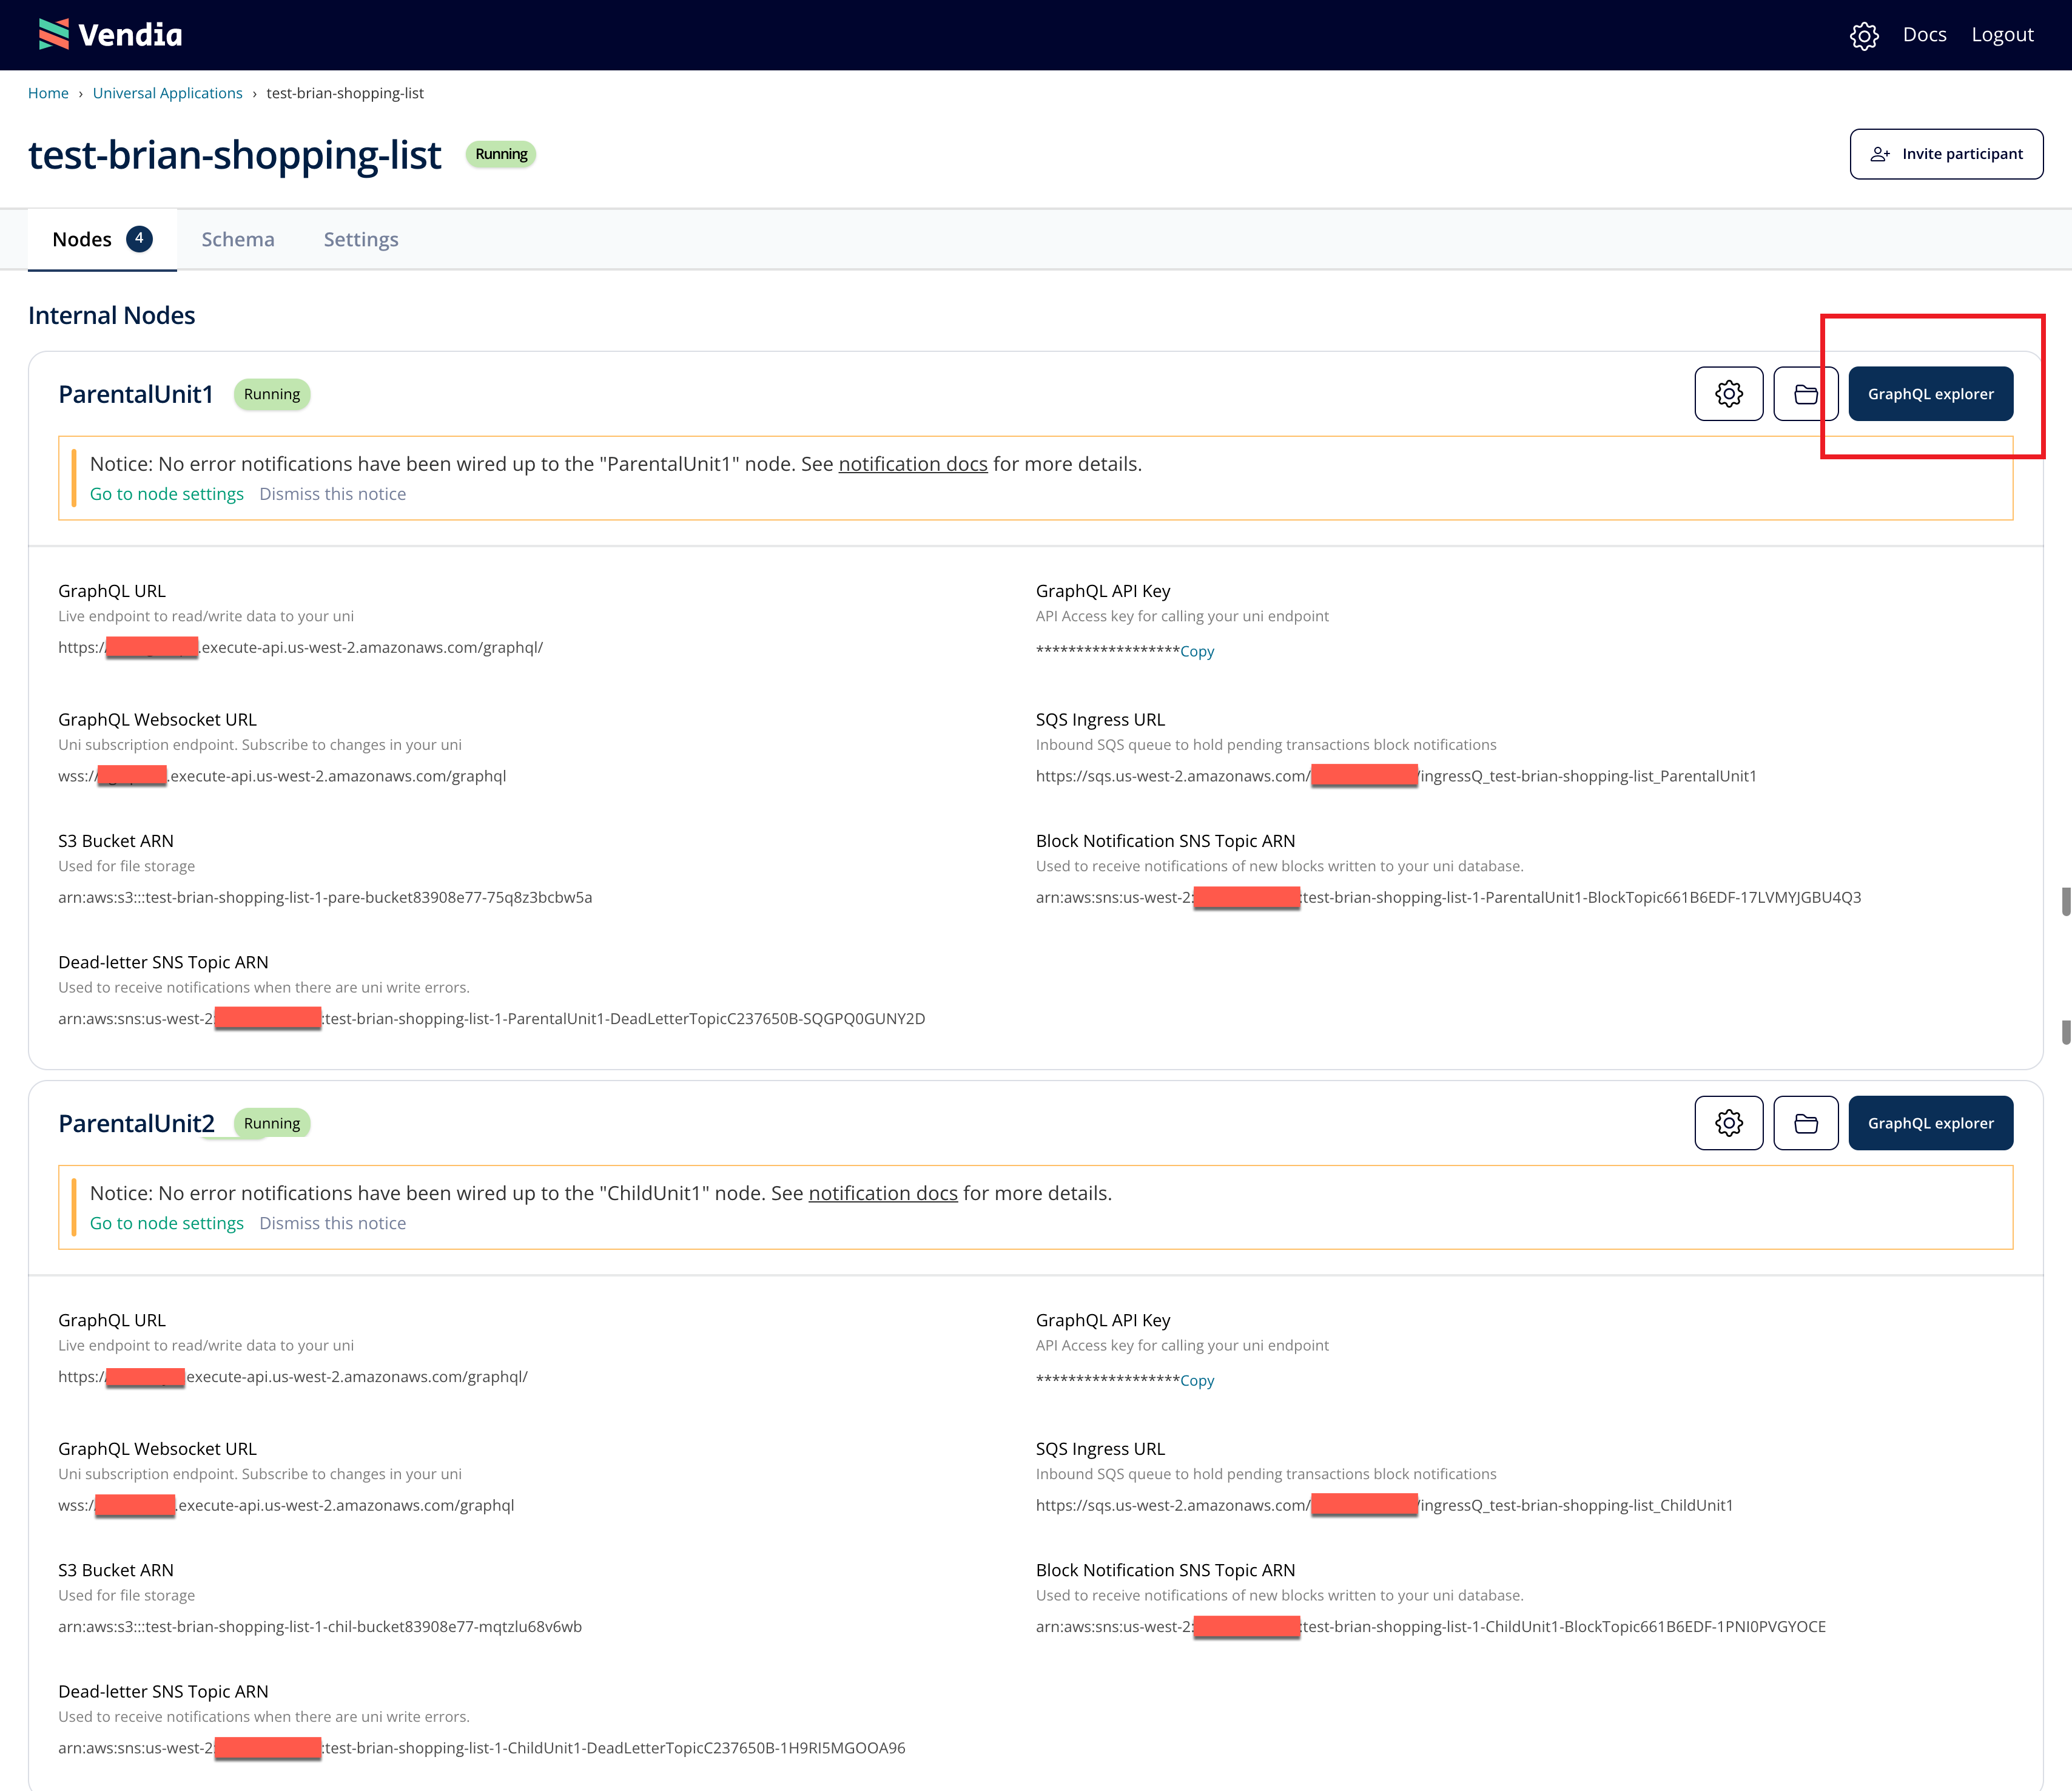
Use Your Uni
Once the Uni's status transitions to RUNNING, we can interact with it to create, read, update, delete, or list data within it.
The remainder of this section works from the Vendia Share Web Application, specifically its GraphQL explorer view.
If you haven't done so already, please login to Vendia Share. When you do, select the Uni created in the previous section and then click the GraphQL explorer button to open the GraphQL explorer view.
Query the Shopping List
Vendia Share automatically generated a complete GraphQL interface automatically when we created our Uni. The GraphQL Queries generated allow us to access data in our Shopping List Uni and the GraphQL Mutations generated allow us to add or modify data in our Shopping List Uni.
It's important to remember that each Node has a consistent, shared view of data so any query issued by any node will return the same value. Any data updates - aka GraphQL mutation - will be applied to all nodes as well.
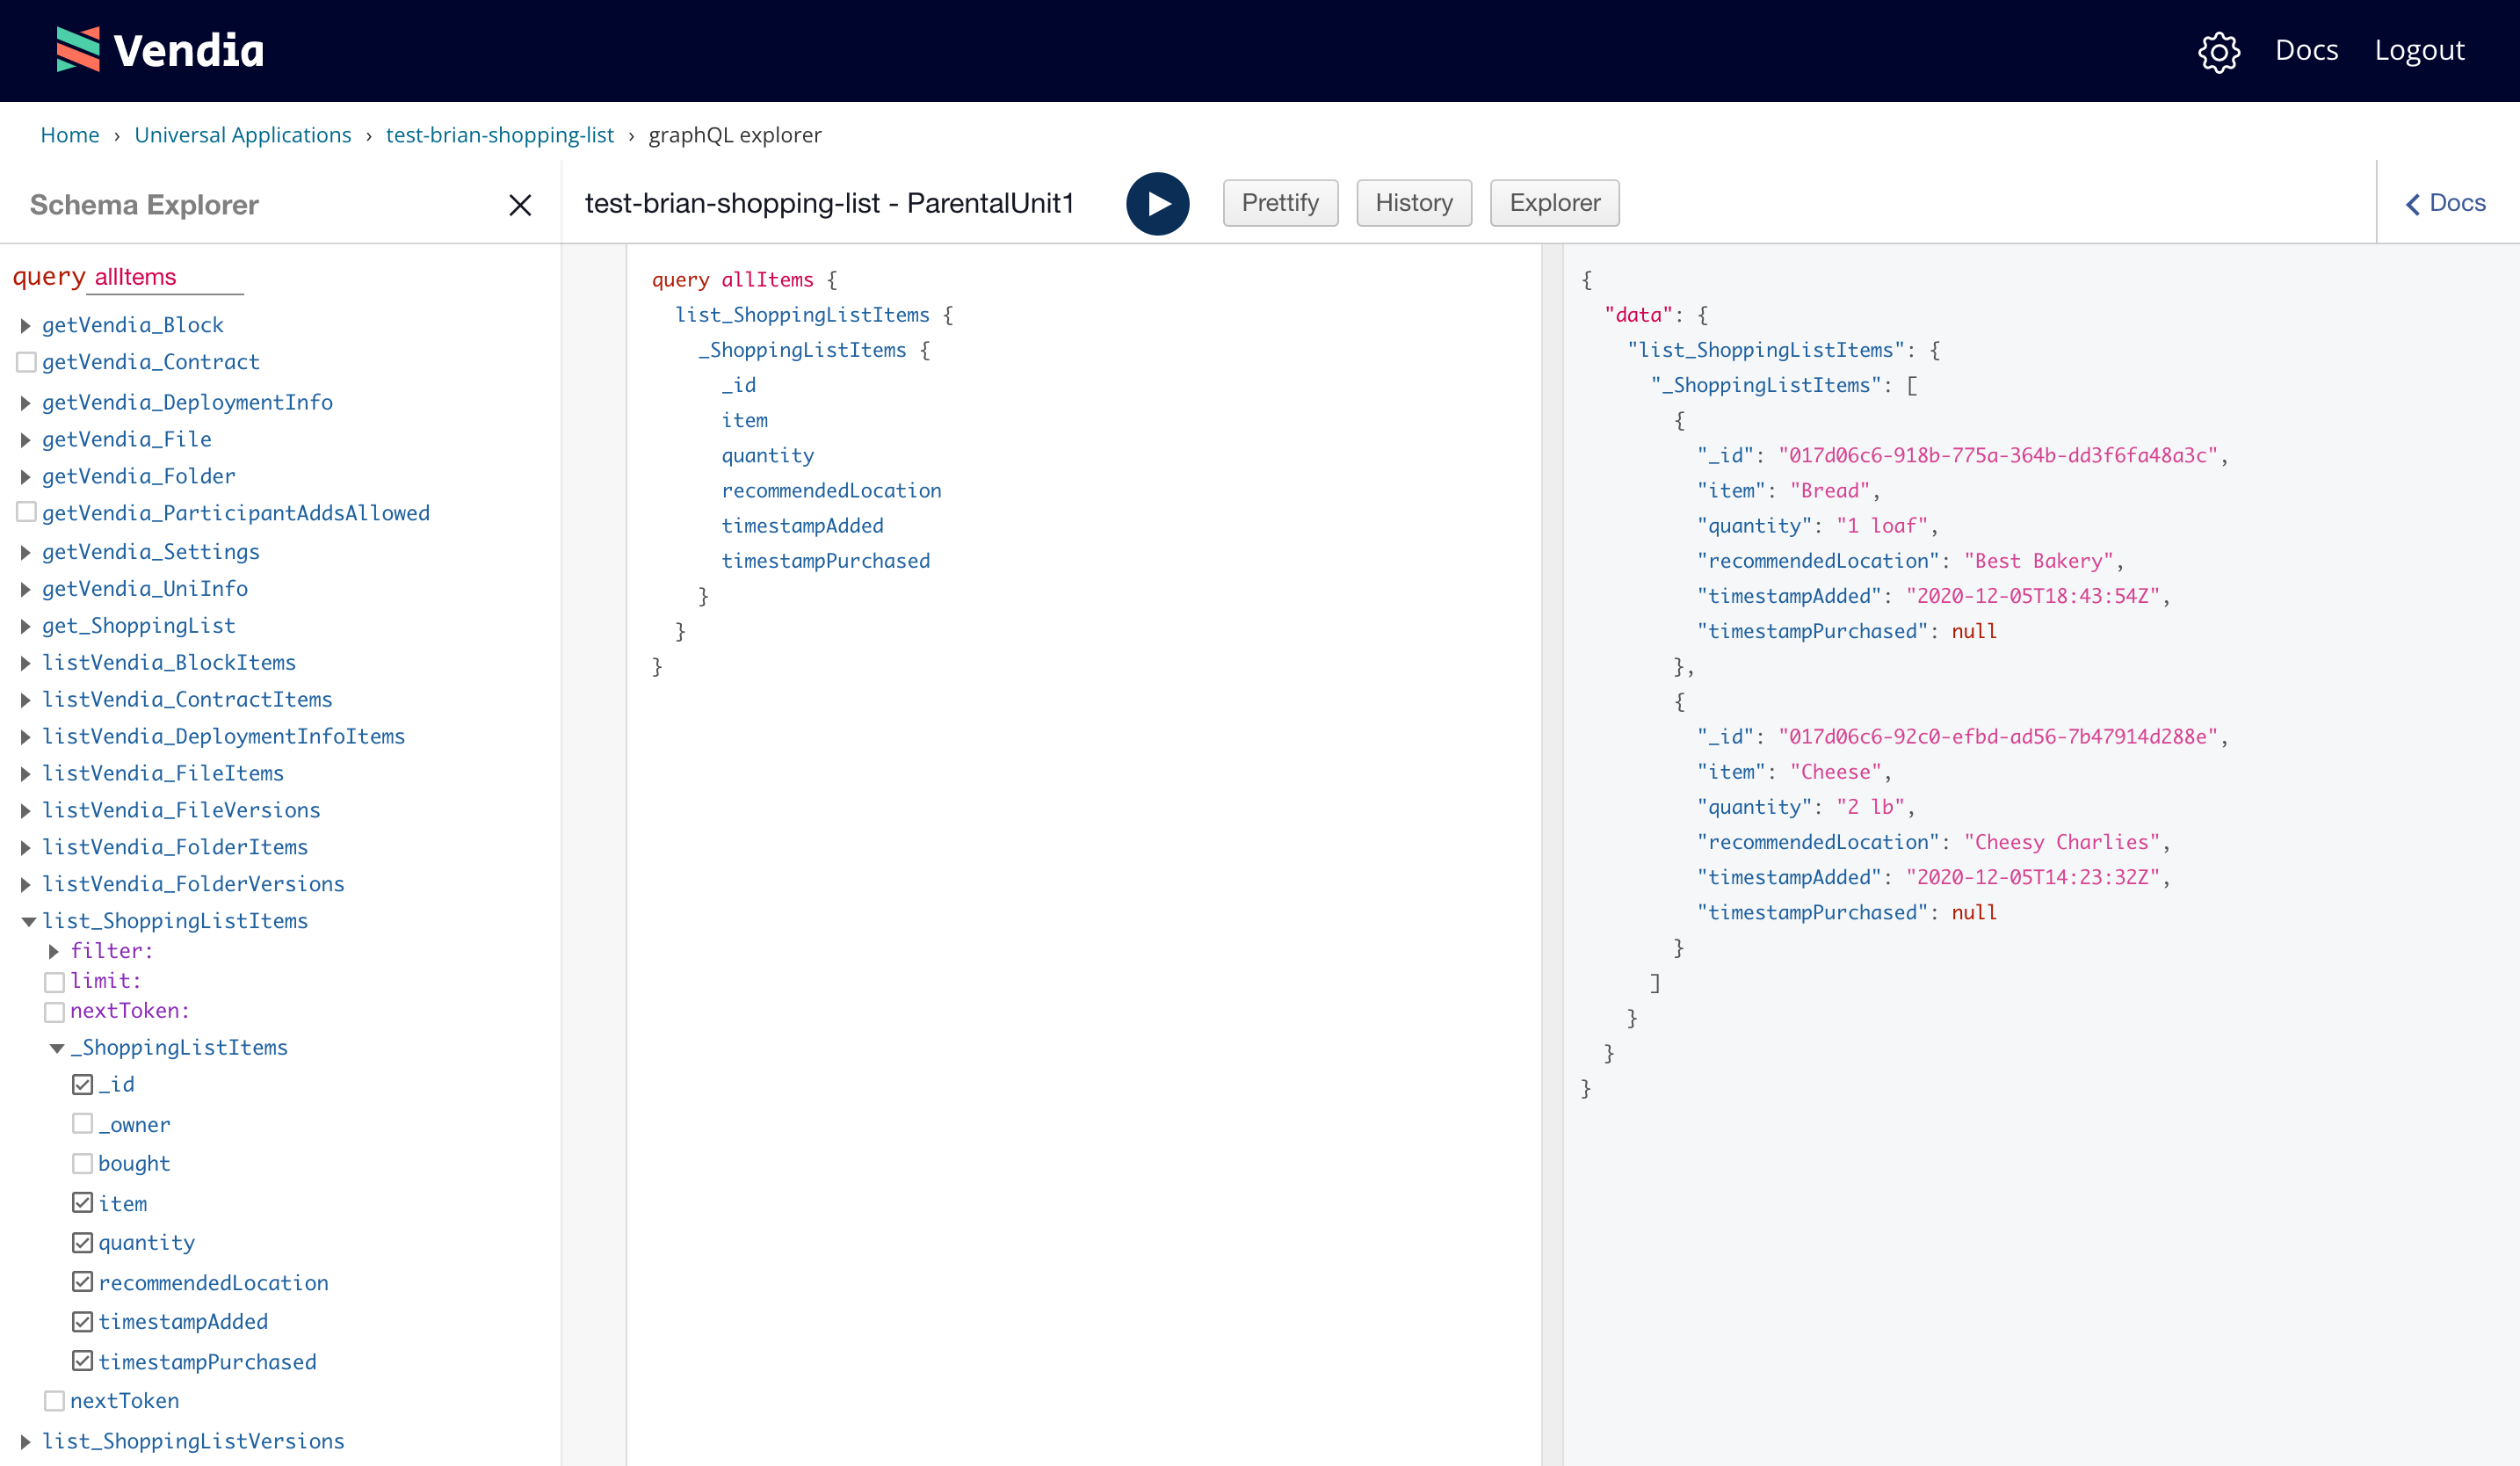
Let's run a query run from a node - say, ParentalUnit1 - to show the Shopping List with our bootstrapped data.
query allItems {
  list_ShoppingListItems {
    _ShoppingListItems {
      _id
      item
      quantity
      recommendedLocation
      timestampAdded
      timestampPurchased
    }
  }
}
You should see a result similar to this one:
Add Items to the Shopping List
Our Uni started off with some existing data but let's add some more.
If ParentalUnit2 wants to have someone pick up two pints of Ben and Jerry's Chubby Hubby ice cream then a mutation will need to be run from the ParentalUnit2 GraphQL Explorer.
mutation addIcecream {
  add_ShoppingList(
    input: {
      item: "Ben and Jerry Chubby Hubby",
      bought: false, quantity: "2 pints",
      recommendedLocation: "Corner Store",
      timestampAdded: "2021-11-11T17:15:32"
    },
    syncMode: ASYNC
  ) {
    transaction {
      _id
    }
  }
}
A subsequent query run from any node - say, ParentalUnit1 - will show the new item in the Shopping List.
query allItems {
  listShoppingLists {
    ShoppingLists {
      bought
      _id
      item
      quantity
      recommendedLocation
      timestampAdded
      timestampPurchased
    }
  }
}
Let's go ahead and add some more items. In my household, ParentalUnit1 manages most of the shopping list. We can run the following mutations from the ParentalUnit1 GraphQL Explorer.
mutation addMilk {
  add_ShoppingList(
    input: {
      item: "Milk",
      bought: false,
      quantity: "1 gallon",
      recommendedLocation: "Awesome Mart",
      timestampAdded: "2020-11-11T09:00:00Z"
    },
    syncMode: ASYNC
  ) {
    transaction {
      _id
    }
  }
}
mutation addEggs {
  add_ShoppingList(
    input: {
      item: "Eggs",
      bought: false,
      quantity: "1 dozen",
      recommendedLocation: "Rural Farm Market",
      timestampAdded: "2021-11-11T13:40:00Z"
    },
    syncMode: ASYNC
  ) {
    transaction {
      _id
    }
  }
}
Query the Shopping List Again
Unfiltered Query
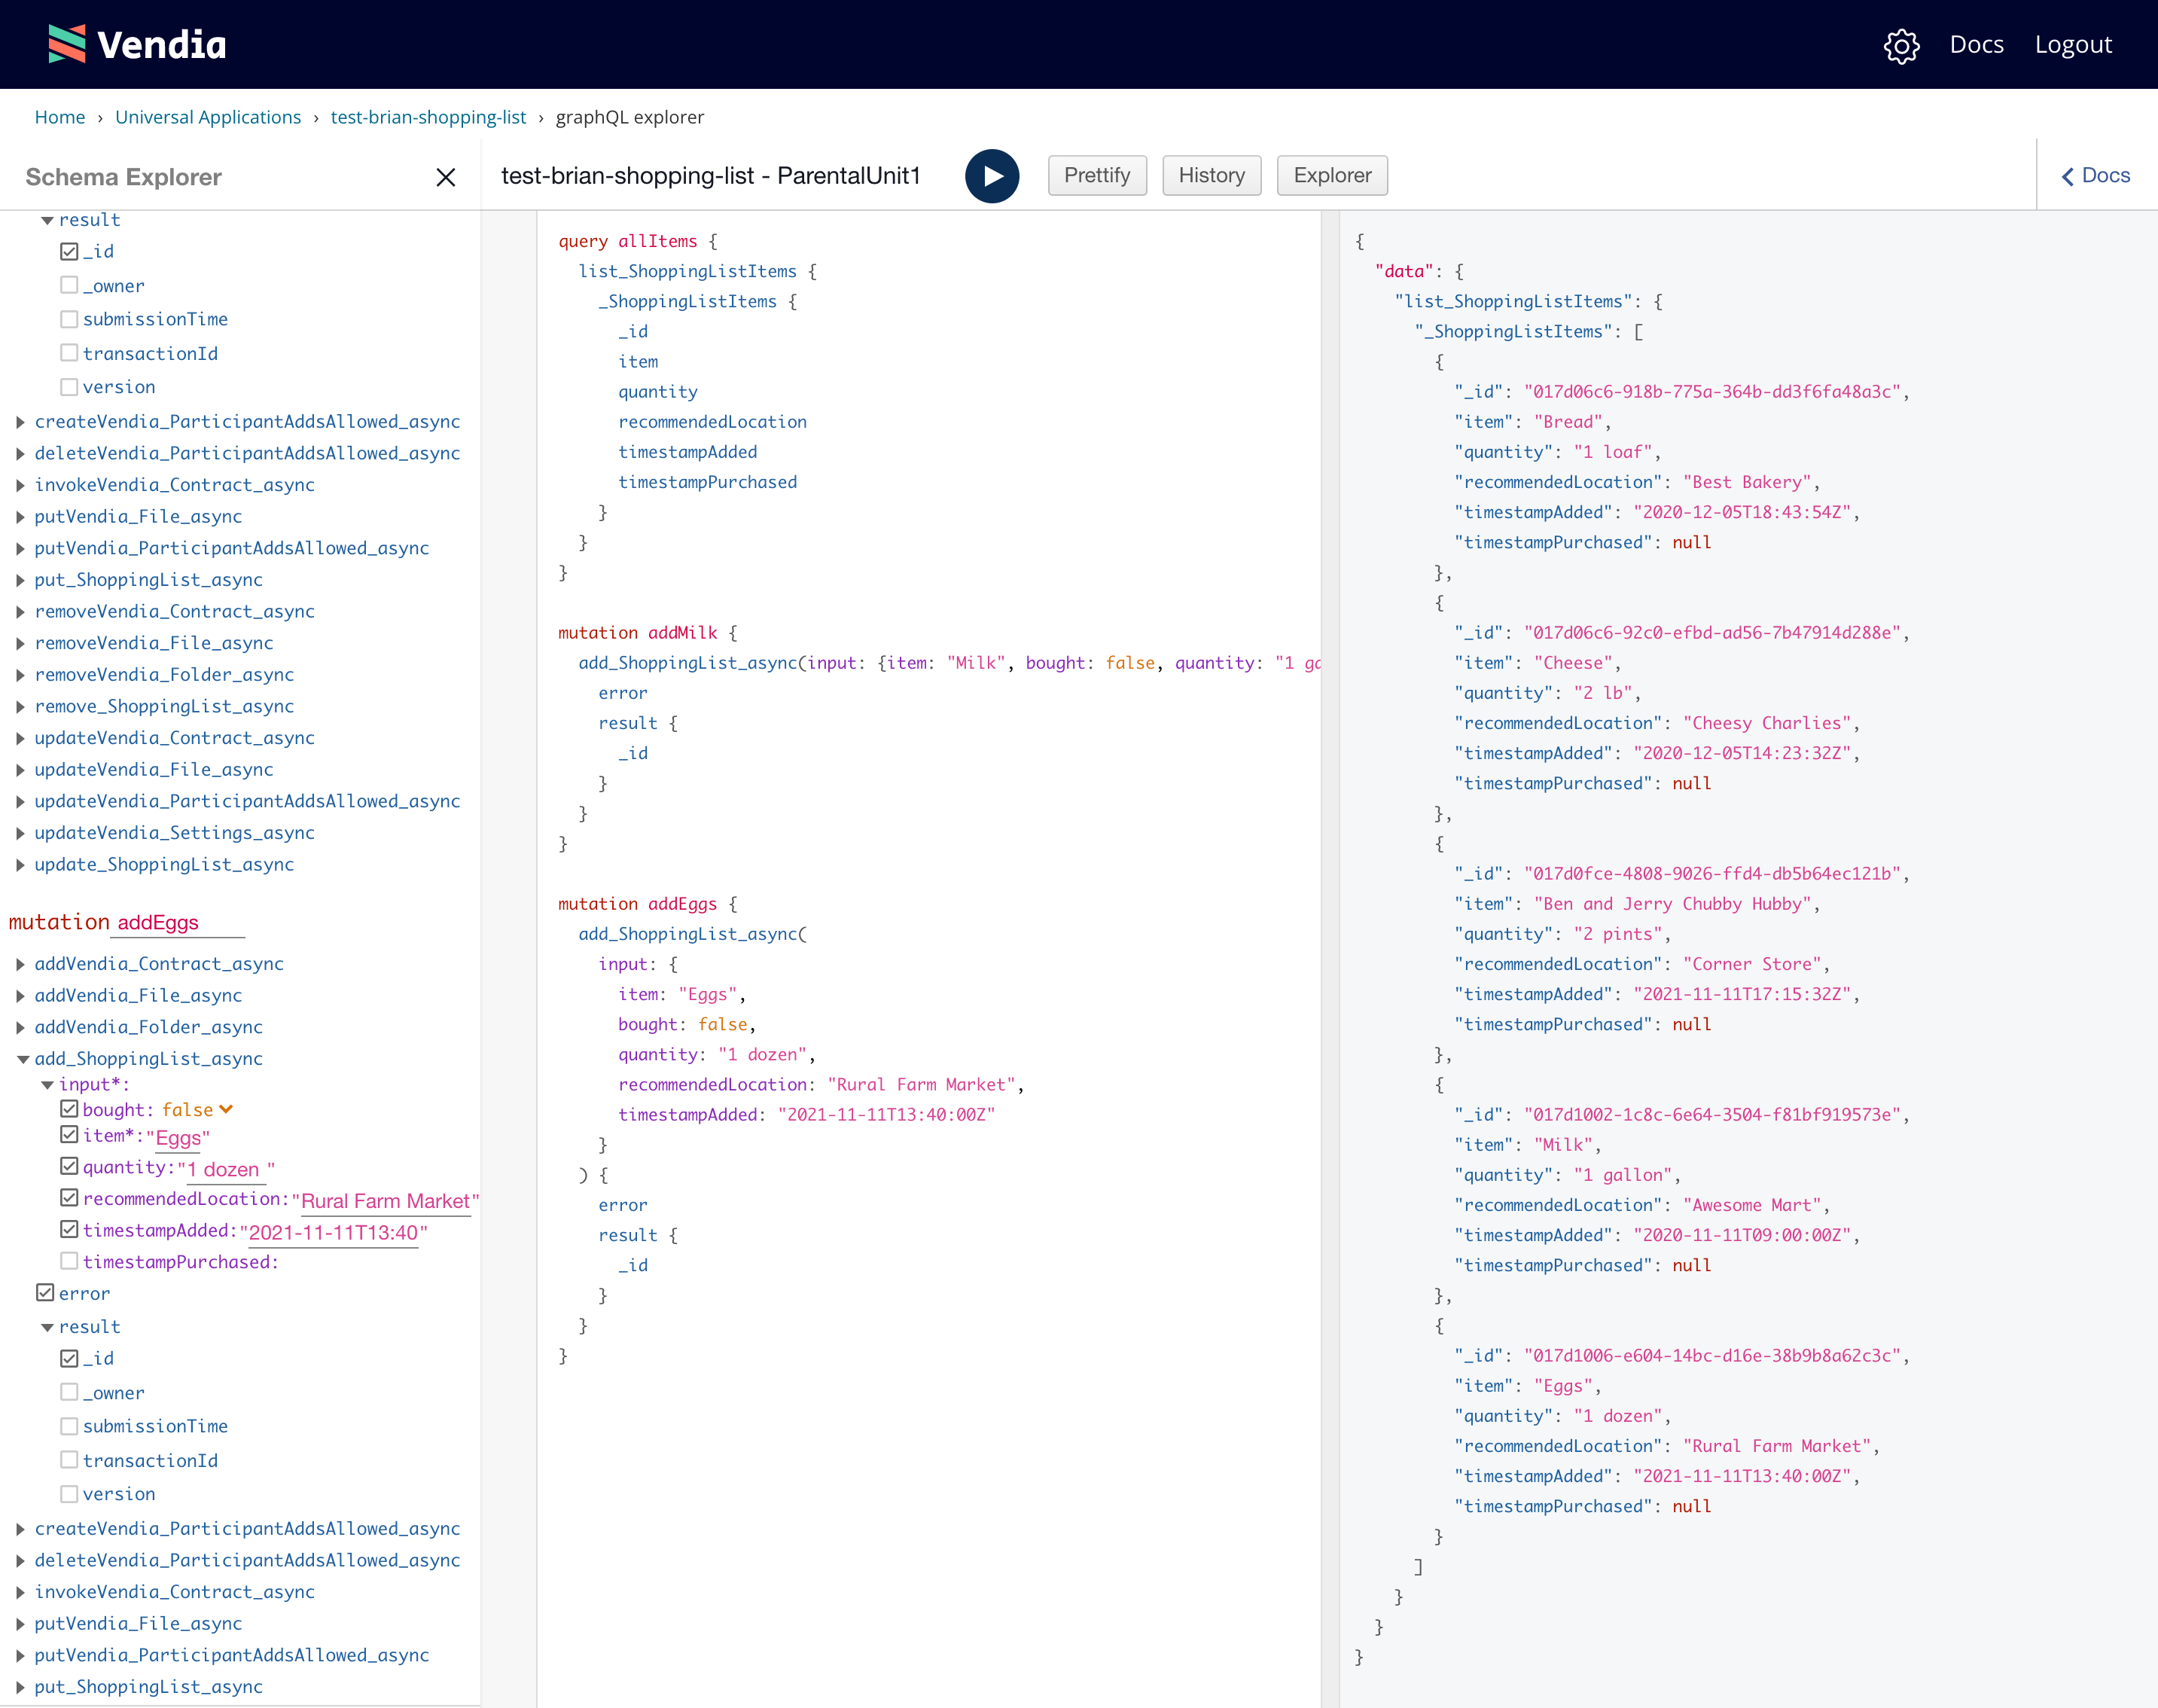
We have the ability to retrieve all of the items in our shopping list. This can be done with the following query.
query allItems {
  list_ShoppingListItems {
    _ShoppingListItems {
      _id
      item
      quantity
      recommendedLocation
      timestampAdded
      timestampPurchased
    }
  }
}
Screenshot of ParentalUnit1 querying the Shopping List after ice cream, Milk, and Eggs were added
It is possible to have multiple GraphQL queries in the GraphQL Explorer. Be sure to select the allItems query when clicking the Play button.
Filtered Query
We have the ability to narrow down the results returned from our Shopping List queries. As a practical matter, we may only be concerned with items that should be bought at a specific store. We can run the following query to narrow down items that have a recommendedLocation equal to Awesome Mart where bought is equal to false.
query awesomeMartQuery {
  listShoppingLists(filter: {
      recommendedLocation: {eq: "Awesome Mart"}, bought: {eq: false}
    }
  ) {
    ShoppingLists {
      bought
      _id
      item
      quantity
      recommendedLocation
      timestampAdded
      timestampPurchased
    }
  }
}
Update the Shopping List
If ParentalUnit2 happens to be at Awesome Mart then they might purchase 1 Gallon of Milk. The following query, specifically a mutation, can be run to update the shopping list to reflect that Milk has been bought.
NOTE The id value in the mutation below will be different for you. Please reference the id returned from the awesomeMartQuery query.
mutation boughtMilk {
  update_ShoppingList(
    id: "017d1002-1c8c-6e64-3504-f81bf919573e",
    input: {
      bought: true,
      timestampPurchased: "2021-11-11T10:00:00Z"
    }
  ) {
    transaction {
      _id
    }
  }
}
Let's confirm that the Shopping List reflects that Milk has been bought. The bought value should be updated to true.
query awesomeMartQuery {
  list_ShoppingListItems(filter: {
    recommendedLocation: {eq: "Awesome Mart"}
  }
) {
    _ShoppingListItems {
      bought
      _id
      item
      quantity
      recommendedLocation
      timestampAdded
      timestampPurchased
    }
  }
}
Examine Shopping List Change History
One very important characteristic of Vendia Share is the ability to present all changes to all data to all nodes in a Uni. We can see how data in our Uni evolves over time. To look at the changes to our Shopping List, we can run the following query.
query shoppingListChanges {
  listVendia_BlockItems {
    Vendia_BlockItems {
      blockId
      commitTime
      transactions {
        mutations
        _owner
      }
    }
  }
}
Result of shopping List Changes GraphQL Query
{
  "data": {
    "listVendia_BlockItems": {
      "Vendia_BlockItems": [
        {
          "blockId": "000000000000001",
          "commitTime": "2021-11-09T22:25:55.790334+00:00",
          "transactions": [
            {
              "mutations": [
                "addSelf_ShoppingList(id:\"017d06c6-92c0-efbd-ad56-7b47914d288e\", input: {item: \"Cheese\", quantity: \"2 lb\", recommendedLocation: \"Cheesy Charlies\", bought: false, timestampAdded: \"2020-12-05T14:23:32Z\"}){error}"
              ],
              "_owner": "ParentalUnit1"
            },
            {
              "mutations": [
                "putVendia_UniInfo(input: {name: \"test-brian-shopping-list.unis.vendia.net\", sku: \"SHARE\", schema: \"{\\\"$schema\\\":\\\"http://json-schema.org/draft-07/schema#\\\",\\\"$id\\\":\\\"http://vendia.com/schemas/demos/shopping-list.json\\\",\\\"title\\\":\\\"Shopping List\\\",\\\"description\\\":\\\"Store shopping list data\\\",\\\"type\\\":\\\"object\\\",\\\"properties\\\":{\\\"ShoppingList\\\":{\\\"description\\\":\\\"Items on the shopping list\\\",\\\"type\\\":\\\"array\\\",\\\"items\\\":{\\\"type\\\":\\\"object\\\",\\\"properties\\\":{\\\"item\\\":{\\\"description\\\":\\\"What to buy\\\",\\\"type\\\":\\\"string\\\"},\\\"quantity\\\":{\\\"description\\\":\\\"How much to buy\\\",\\\"type\\\":\\\"string\\\"},\\\"recommendedLocation\\\":{\\\"description\\\":\\\"Where I should buy\\\",\\\"type\\\":\\\"string\\\"},\\\"bought\\\":{\\\"description\\\":\\\"Whether it has been bought\\\",\\\"type\\\":\\\"boolean\\\"},\\\"timestampAdded\\\":{\\\"description\\\":\\\"When the item was added\\\",\\\"type\\\":\\\"string\\\",\\\"format\\\":\\\"date-time\\\"},\\\"timestampPurchased\\\":{\\\"description\\\":\\\"When the item was purchased\\\",\\\"type\\\":\\\"string\\\",\\\"format\\\":\\\"date-time\\\"}},\\\"required\\\":[\\\"item\\\"]}}}}\", schemaNamespace: \"Self\", status: \"RUNNING\", createdTime: \"2021-11-09T22:16:56.130845+00:00\", updatedTime: \"2021-11-09T22:25:55.790334+00:00\", nodes: [{name: \"ParentalUnit1\", userId: \"2674ecfd-f65a-48c9-99bd-fe0115a00ab6\", userEmail: \"brian+demo@vendia.net\", status: \"RUNNING\", region: \"us-west-2\", vendiaAccount: {csp: \"AWS\", accountId: \"943506818770\", org: \"332134949057\"}}, {name: \"ParentalUnit2\", userId: \"2674ecfd-f65a-48c9-99bd-fe0115a00ab6\", userEmail: \"brian+demo@vendia.net\", status: \"RUNNING\", region: \"us-west-2\", vendiaAccount: {csp: \"AWS\", accountId: \"532889100462\", org: \"332134949057\"}}}]}) {error}"
              ],
              "_owner": "ParentalUnit1"
            },
            {
              "mutations": [
                "addVendia_DeploymentInfo(id:\"2021-11-09T22:25:55.790334+00:00\", input: {deploymentTime: \"2021-11-09T22:25:55.790334+00:00\" , consensusDefinitionHash: \"9b6a3fab262d668c2bf61621937511a46ed591a69d0665f04a89ca18b368d65e\" , versionTag: \"prod-release.2021-11-08.4acd675\" } ) {error}"
              ],
              "_owner": "ParentalUnit1"
            },
            {
              "mutations": [
                "addSelf_ShoppingList(id:\"017d06c6-918b-775a-364b-dd3f6fa48a3c\", input: {item: \"Bread\", quantity: \"1 loaf\", recommendedLocation: \"Best Bakery\", bought: false, timestampAdded: \"2020-12-05T18:43:54Z\"}){error}"
              ],
              "_owner": "ParentalUnit1"
            }
          ]
        },
        {
          "blockId": "000000000000002",
          "commitTime": "2021-11-11T16:22:05.552619+00:00",
          "transactions": [
            {
              "mutations": [
                "addSelf_ShoppingList(id:\"017d0fce-4808-9026-ffd4-db5b64ec121b\",input: {bought: false, item: \"Ben and Jerry Chubby Hubby\", quantity: \"2 pints\", recommendedLocation: \"Corner Store\", timestampAdded: \"2021-11-11T17:15:32Z\"}){error}"
              ],
              "_owner": "ParentalUnit2"
            }
          ]
        },
        {
          "blockId": "000000000000003",
          "commitTime": "2021-11-11T17:18:42.959053+00:00",
          "transactions": [
            {
              "mutations": [
                "addSelf_ShoppingList(id:\"017d1002-1c8c-6e64-3504-f81bf919573e\",input: {bought: false, item: \"Milk\", quantity: \"1 gallon\", recommendedLocation: \"Awesome Mart\", timestampAdded: \"2020-11-11T09:00:00Z\"}){error}"
              ],
              "_owner": "ParentalUnit1"
            }
          ]
        },
        {
          "blockId": "000000000000004",
          "commitTime": "2021-11-11T17:23:52.472582+00:00",
          "transactions": [
            {
              "mutations": [
                "addSelf_ShoppingList(id:\"017d1006-e604-14bc-d16e-38b9b8a62c3c\",input: {bought: false, item: \"Eggs\", quantity: \"1 dozen\", recommendedLocation: \"Rural Farm Market\", timestampAdded: \"2021-11-11T13:40:00Z\"}){error}"
              ],
              "_owner": "ParentalUnit1"
            }
          ]
        },
        {
          "blockId": "000000000000005",
          "commitTime": "2021-11-11T17:48:42.473748+00:00",
          "transactions": [
            {
              "mutations": [
                "updateSelf_ShoppingList(id:\"017d1002-1c8c-6e64-3504-f81bf919573e\",input: {bought: true, timestampPurchased: \"2021-11-11T10:00:00Z\"}){error}"
              ],
              "_owner": "ParentalUnit2"
            }
          ]
        }
      ]
    }
  }
}
Take note that we have the ability to see the Mutation that was run to update the Shopping List, the Owner or node who introduced the change, and when the change occurred. This demonstrates the value and utility of Vendia Share's serverless distributed ledger backing our Shopping List.
What's Next
This quick start illustrated how to define Vendia Share Unis and how to query and update data in the Uni. We used the built-in GraphQL Explorer provided by each node.
Though our Shopping List example, we showed how each node in the Shopping List Uni has a consistent view of the data. When we query for all items, or a subset of items, any party will see the same data. We also showed that any changes to the underlying data - the GraphQL mutuation that was run and the party that ran it - is visible to all nodes.
Please keep in mind we are not constrained to simply using the GraphQL explorer. Vendia Share provides other mechanisms for getting data into and out of Unis. Please refer to our documentation on Integrating Vendia Unis with Other Cloud-based Services.